


As recently mentioned on my other blog (Time Machine) I’m going to spend some time walking through what I’ve done so far on my GameDevHQ program. Now as a reminder, the program I have is an older one, not the current “Professional Unity Developer Program (PUDP).” Much, but not all of the program I paid for has since been bundled in two video learning courses you can purchase on Udemy. They are: “The Ultimate Guide to Game Development with Unity (Official)” and “The Unity C# Survival Guide.”
Because this is an older version of the program, it uses older versions of Unity. Arguably, you can use the latest version of Unity, however, the Unity Hub makes it pretty easy to download and switch between multiple versions of the Unity Editor. Given how easy it is, I choose to go ahead and use Unity 2019 as well as Visual Studio 2019. That allows for as much as possible for what I do to match the video lessons. At this point, Unity 2019 has moved off the short list of Editor versions in Unity Hub, so you have to download it from the archive. However, the videos actually show you how to do that (though it demonstrated downloading Unity 2018).
Overall, the process is easy enough, and the videos clear enough there is very little in need of explanation for the whole download and setup. It was clear enough that even on Linux (with the exception of authentication which had to be fixed with a hack), it worked exactly as demonstrated.
So, for this post, I am going to just review my notes and retry anything I had forgotten. Mostly this means taking some time to mess around with the IDE Navigation again. With just a quick peruse, I am reminded of a few features I’ve not made much use of.
First, let’s review Navigation. For no good reason I can think of, I’ve been using the click-and-pan method of moving around the screen and that is a pretty clumsy way to move around the screen. The videos even come right out and say that. But in my last hiatus I apparently forgot about the FPS mode. In FPS mode, you right-click the mouse and then use the WASD keys to pan.
As an aside, I discovered (or perhaps rediscovered) the arrow keys work just like the WASD keys, but you don’t have to right-click the mouse which is nice.
Another handy tip I’d forgotten was the hot keys attached to the Scene Tool bar. Each of these are mapped to one of the QWERTY keys.
[Q]Hand Tool. Click, hold and move to pan around[W]Move (Translate) Tool[E]Rotate Tool[R]Stretch (scale) Tool[T]React Tool[Y]Move/Rotate or Scale. All at once.


The cool thing though, is that you really don’t have to memorize them. Because they are mapped to the top left keys, you can just cycle through them really fast until the control you want appears around the object you selected. Way less time than clicking on the object, looking up at the icons and trying to remember what each one is. Or worse, flying the mouse over for the ToolTip. Heck, you don’t even have to select the game object in the Scene Window. You can select it in the Hierarchy view, then “QWERTY” it.
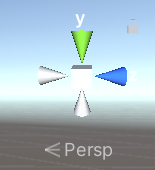
The next part is the Screen Gizmo. This one is given pretty short shrift in the video which is too bad. Maybe it is just because we don’t need much of its power just yet. But this control seems to be one of the easiest ways for me to get out of whack. When it goes wrong, I end up just clicking away until it magically gets better. This is at least partially due to things like the Arrow Keys and WASD keys working differently depending on whether or not the Screen Gizmo is in Perspective or Isometric (Orthogonal) mode. i.e. the WS keys don’t do anything in Isometric mode. It doesn’t help that I usually switch between modes on accident due to some sort of mousing mishap, so am usually caught by surprise when the screen is not doing what I want.
On the other hand, if you switch the Scene Window to “2D View” none of this matters because the Screen Gizmo goes away and you only have the arrow keys. (Note to future self, in 2D View mode, the scroll wheel zooms in and out. On the Helix, which has no scroll wheel, use Alt-Right Click. Make sure you get a little magnifying glass. Then drag a finger across the track pad or use the track point.)
In general, I would suggest to my future self that navigating the Scene Window will take some practice, so try not to get frustrated.
The final bit in these opening modules is modifying the Layout. It may seem a silly thing, but the whole point of an Integrated Development Environment (IDE) is to make your development process seamless, primarily by putting what you need most where you most need it. So, watch that video. On my Helix, I use the layout they recommend. On my W520, I use a different layout because of the larger screen. Time blipping again (for just a moment), I can predict a future where I have multiple layouts depending not just one what device (screen) I am working from, but what part in the work flow I find myself. I may have different layouts for different tasks.
The point is, if moving around the IDE seems cumbersome, spend some time adjusting it. And, if you happen to work on multiple devices like I do, the Layout files are not in the Project directories. This means they won’t get version controlled with your project. This means, they will not magically appear on each of your devices. This may or may not be what you want. If you are using Windows, these files are located in your C:\Users\<user>\AppData\Roaming\Unity\Editor-5.x\Preferences\Layouts\default directory. The Layout files all have a *.wlt extension. Consider copying these somewhere, versioning them and copying them device to device. New versions of the IDE have an option under the Window -> Layouts menu to load custom Layouts.


Now, the above was supposed to be the end of this article, but since we are time traveling anyway, we can take this moment and inject some additional configuration items that actually appeared later but are better suited for this article. The Unity Editor is now setup, and we can now create game objects to our heart’s content. However, when we start creating our behavior, we will need to write C# scripts and those we cannot do in Unity. We will need to configure an external code editor.
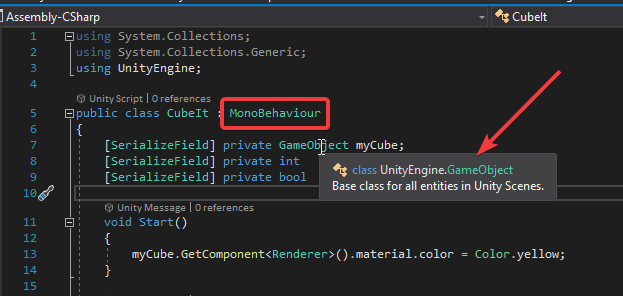
Visual Studio Community Edition, similar to Unity has an installer that allows you to install multiple versions of Visual Studio. It also allows you to install various options. The option in particular needed is the Unity Tools. If you miss this during the initial install, you can restart the Visual Studio Installer again and just add them. If you want, you can also install later versions of Visual Studio as well. With the Unity Tools installed, the Visual Studio Editor will recognize the Unity classes and packages. This will enable the IntelliSense features of the code editor. The quickest, easiest way to see this is working is when you create your first script, the class declaration line should color the class name “Monobehavior” green, instead of white. Once you start coding, the additional IntelliSense features such as code completion, code assist, help, etc. will start working as well.
Once Visual Studio is installed, we can configure Unity to invoke Visual Studio whenever we wish to edit a C# script. This is done in Unity by selecting the following menu sequence, Edit -> Preferences -> External Tools -> External Script Editor. In the drop-down field, ensure Visual Studio is selected. Be sure to select “Regenerate Project Files” once you have made the change.

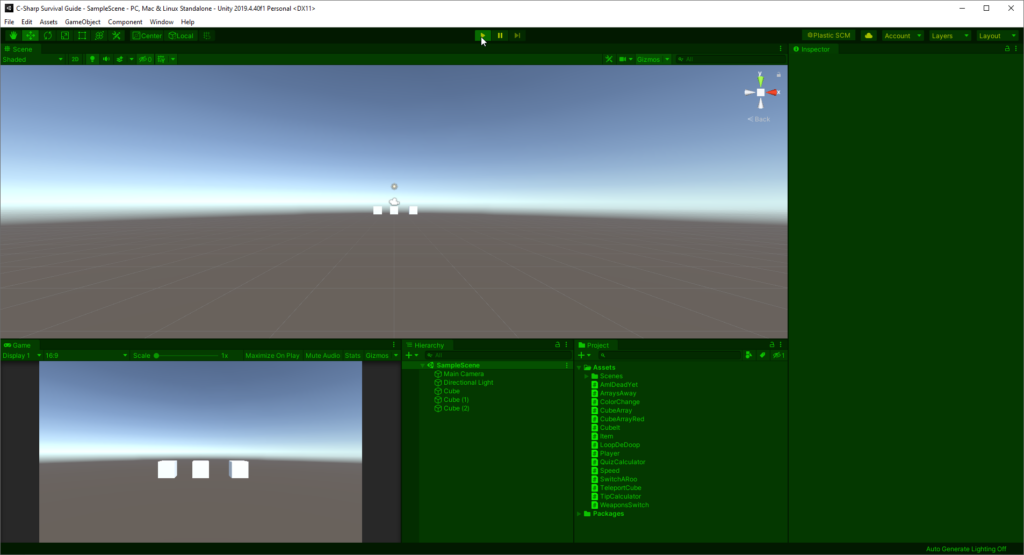
The final thing I wanted to add is Playmode configuration. One of the things I struggled quite a bit with initially was the delay when I hit the play button to test the game. It was just never as obvious as I would like when the editor was in play mode or not. Fortunately, those clever folks at Unity thought of this. They just did not configure it out of the box. All I had to do was see it in a video once to go looking for it. Select Edit -> Preferences -> Color -> Playmode Tint and select a color.

I’ve seen others choose red, but I chose green. By setting this option, the entire editor, except the Game and Scene Window will be shaded with this color making it VERY obvious you are in play mode.
Next, we start coding…