

As the image above implies, this article is based on an article at IntoGuide. The article is great but the blog page is so chock full of add popping nonsense it drove me crazy and actually made me doubt the viability of the page. However, I know I will need this information again and I got to this page from the Hackintosh page, so if you are willing to trust them…
Regardless, the info was good and helped me out. They even have videos on YouTube if you prefer that mode of education. They left off just one thing I needed and that was to enable USB3 support. The indicator was no mouse or keyboard when I started the VM.
For what it is worth, although the directions are written for VirtualBox on Windows, it also worked for VirtualBox on Linux.
With that, let’s jump in…
Get an Image File
These directions involve creating a virtual machine from a pre-made VMDK file. Techsviewer has an article on creating a VM from original media here. The primary reason for using one over the other of course, is how you obtain your MacOS media and the level of trust you attribute to the source. The IntoGuide folks have pre-made VMDK files. You can create installation media (from an ISO/DVD image) from any Macintosh connected to the App Store.
Install VirtualBox
This is pretty much download, point and click. There are many, many guides out there should you need one.
Create the Virtual Machine (VM)
This is basically the relevant part. This should be mostly the same regardless of whether you are installing from a pre-made VMDK file, or from install media. At this time, I am taking these settings pretty much for granted as they worked and I have very little Apple experience to make a better call.
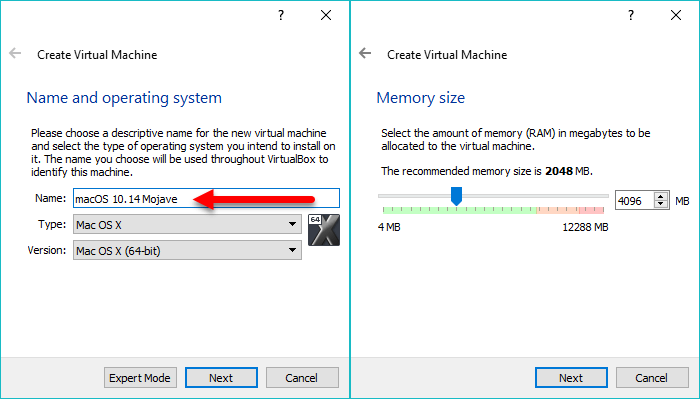
Start up Virtual Box and click on “New” to create a new VM. The first two screens of the new virtual machine wizard ask for a name, type and version and on the second screen, the amount of memory (virtual RAM) to allow. Depending on the version of VirtualBox you have and the version of MacOS you are trying to install, you might be able to set the specific version. If not, just go with the generic, “Mac OS X (64-bit)” version label. Move the slider (or type in the box) to allocate 4GB (4096MB) of virtual RAM.
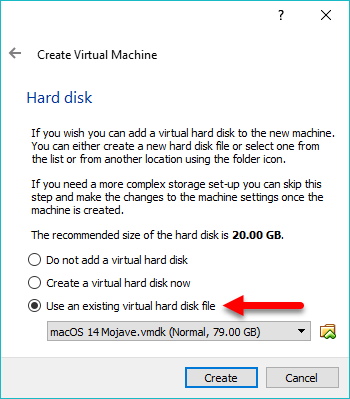
Next is a part that will differ depending on your MacOS source. If you have a pre-made VMDK, you will attach that here in the Hard Disk definition. Select “Use an existing virtual hard disk file” and use the browser to find and select it. At this point, a directory structure should have been created for your new VM, so you can copy this file into that directory to keep everything together.
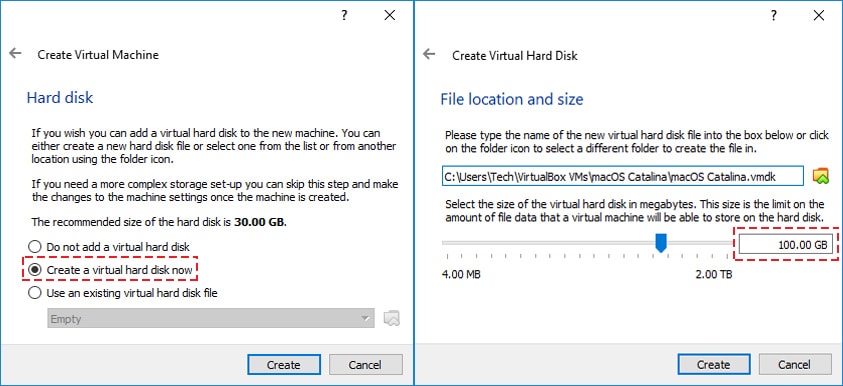
Otherwise, you will “Create a new virtual hard disk” and set the size.
Next you will change some of the default settings for the VM. Again, this part I am just going on the original site for their suggestions, not some deep Mac know-how.
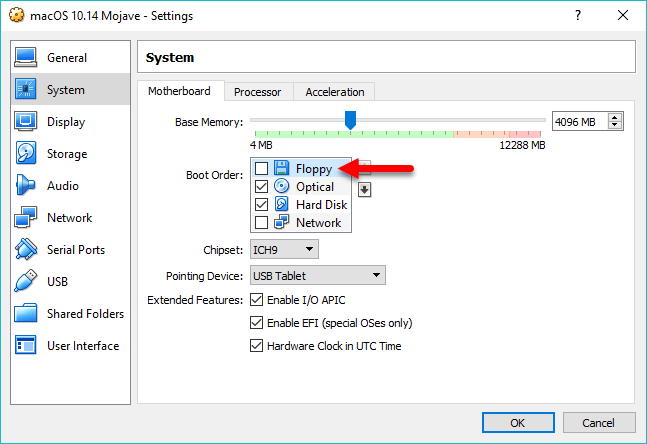
First, remove the Floppy Disk from the Boot Order
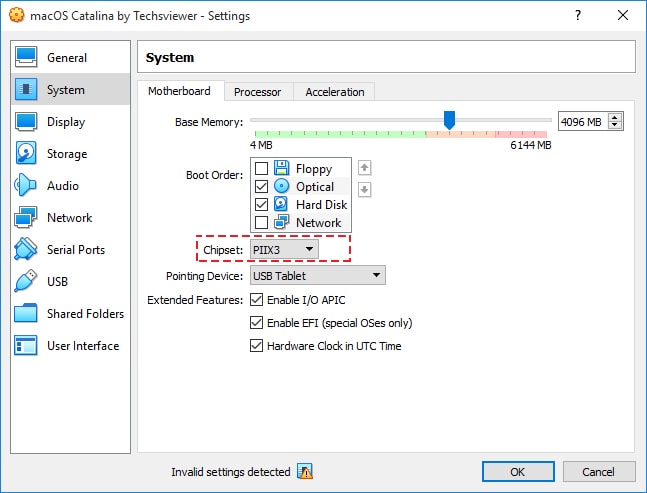
Now for Catalina (Mac OSX 10.15), they suggest changing the Chipset from ICH9 to PIIX3 and they specifically callout enabling EFI support.
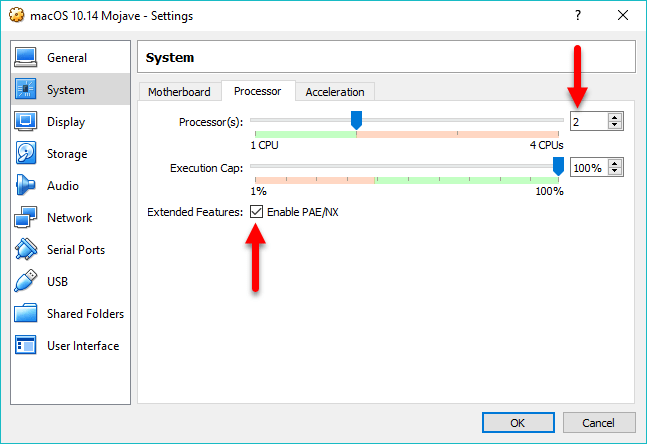
Next, increase the number of processors to 2, and enable the PAE/NX feature.
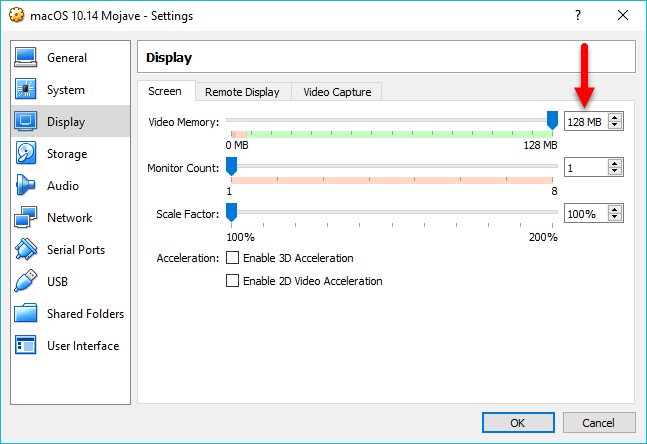
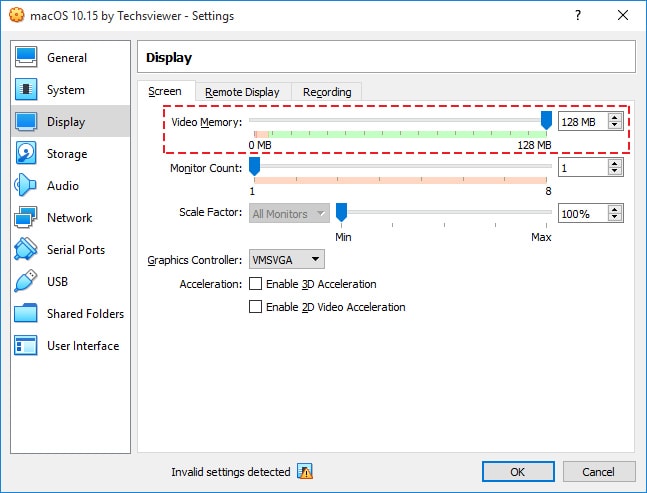
In the Display settings, up the Video Memory to 128MB and if you wish, enable the 3D acceleration if your graphics card and host operating system support it.
For Catalina, they also suggest making sure the Graphics Controller is set to VMSVGA. For Mojave, the default VBoxVGA seems to be working at the moment.
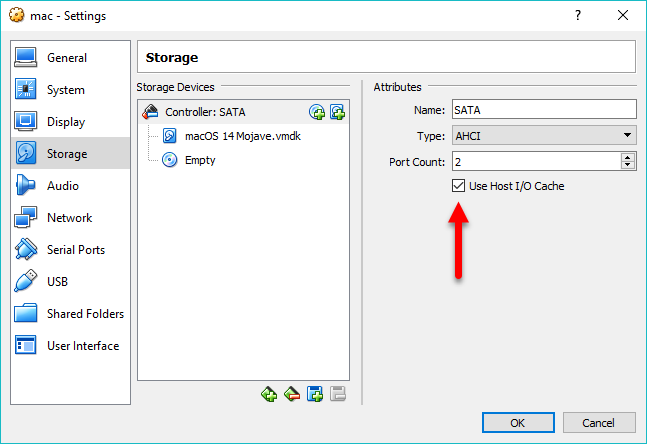
In Storage, be sure to enable the Host I/O caching feature.
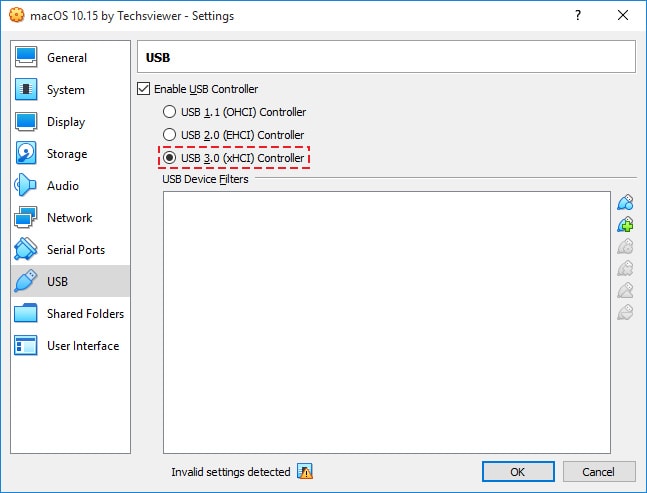
Next, the one that was missed in the original instructions, be sure to enable USB3 support.
If you are using a pre-made VMDK file, you are done with the settings. If you are installing from an ISO image, you need to mount the ISO image in the Storage tab.

Additional Changes
Next you will need to make some more changes using the VBoxManage utility. On Windows, you may need to do this in an Administrator command prompt. You will need to replace the text “Your VM Name” with the actual name of the VM you created.
For Mojave (10.14) execute the following commands:
cd "C:\Program Files\Oracle\VirtualBox\"
VBoxManage.exe modifyvm "Your VM Name" --cpuidset 00000001 000106e5 00100800 0098e3fd bfebfbff
VBoxManage setextradata "Your VM Name" "VBoxInternal/Devices/efi/0/Config/DmiSystemProduct" "iMac11,3"
VBoxManage setextradata "Your VM Name" "VBoxInternal/Devices/efi/0/Config/DmiSystemVersion" "1.0"
VBoxManage setextradata "Your VM Name" "VBoxInternal/Devices/efi/0/Config/DmiBoardProduct" "Iloveapple"
VBoxManage setextradata "Your VM Name" "VBoxInternal/Devices/smc/0/Config/DeviceKey" "ourhardworkbythesewordsguardedpleasedontsteal(c)AppleComputerInc"
VBoxManage setextradata "Your VM Name" "VBoxInternal/Devices/smc/0/Config/GetKeyFromRealSMC" 1
VBoxManage setextradata "Your VM Name" VBoxInternal2/EfiGraphicsResolution 1920x1080
For Catalina (10.15), execute the following commands:
cd "C:\Program Files\Oracle\VirtualBox\"
VBoxManage.exe modifyvm "Your VM Name" --cpuidset 00000001 000106e5 00100800 0098e3fd bfebfbff
VBoxManage setextradata "Your VM Name" "VBoxInternal/Devices/efi/0/Config/DmiSystemProduct" "iMac11,3"
VBoxManage setextradata "Your VM Name" "VBoxInternal/Devices/efi/0/Config/DmiSystemVersion" "1.0"
VBoxManage setextradata "Your VM Name" "VBoxInternal/Devices/efi/0/Config/DmiBoardProduct" "Iloveapple"
VBoxManage setextradata "Your VM Name" "VBoxInternal/Devices/smc/0/Config/DeviceKey" "ourhardworkbythesewordsguardedpleasedontsteal(c)AppleComputerInc"
VBoxManage setextradata "Your VM Name" "VBoxInternal/Devices/smc/0/Config/GetKeyFromRealSMC" 1
VBoxManage setextradata "Your VM Name" VBoxInternal2/EfiGraphicsResolution 1920x1080
Actually, they look the same. I have not yet done any research to understand what they actually do.
Kick the tires, and light the fires…!
Once you have executed these commands, you should be able to startup the VM. If you chose to use a pre-made VMDK, you will have to just go through a few initialization steps. If you choose the ISO image, it will initiate the standard installation process. Either way, answer the questions and you should be good to go.
Special Note…
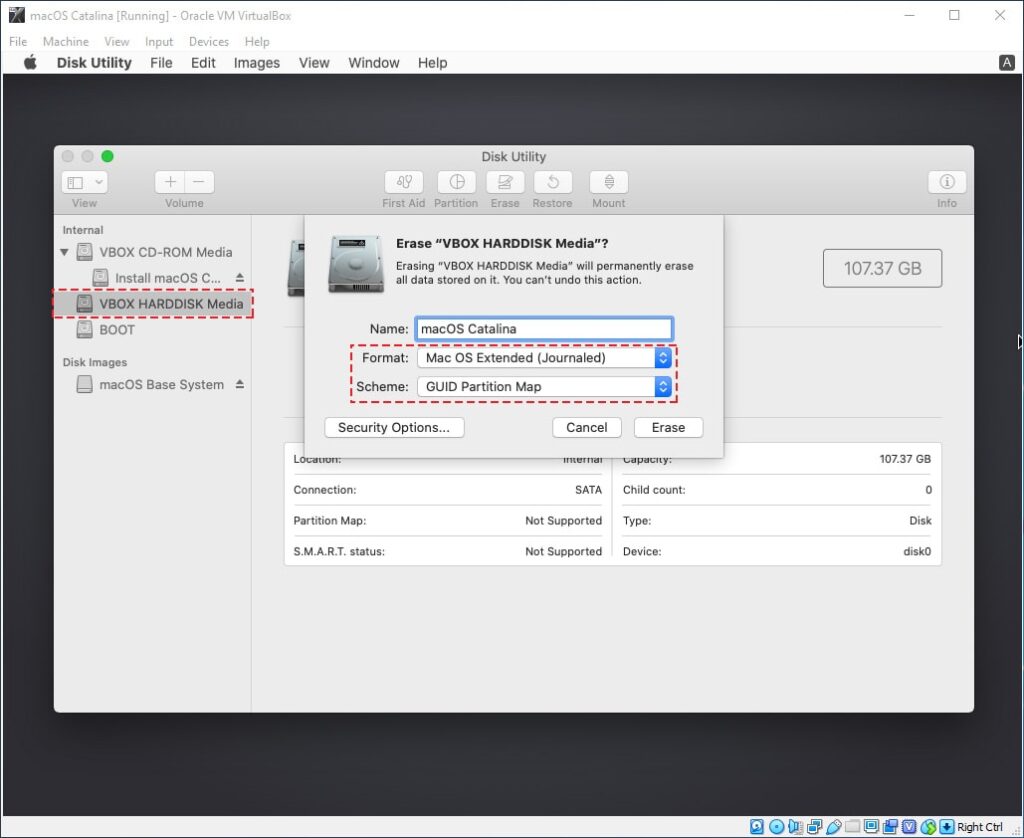
If you choose the ISO installation, another, perhaps non-obvious steps will need to occur. First, you will need to start the Disk Utility to format the virtual hard disk.
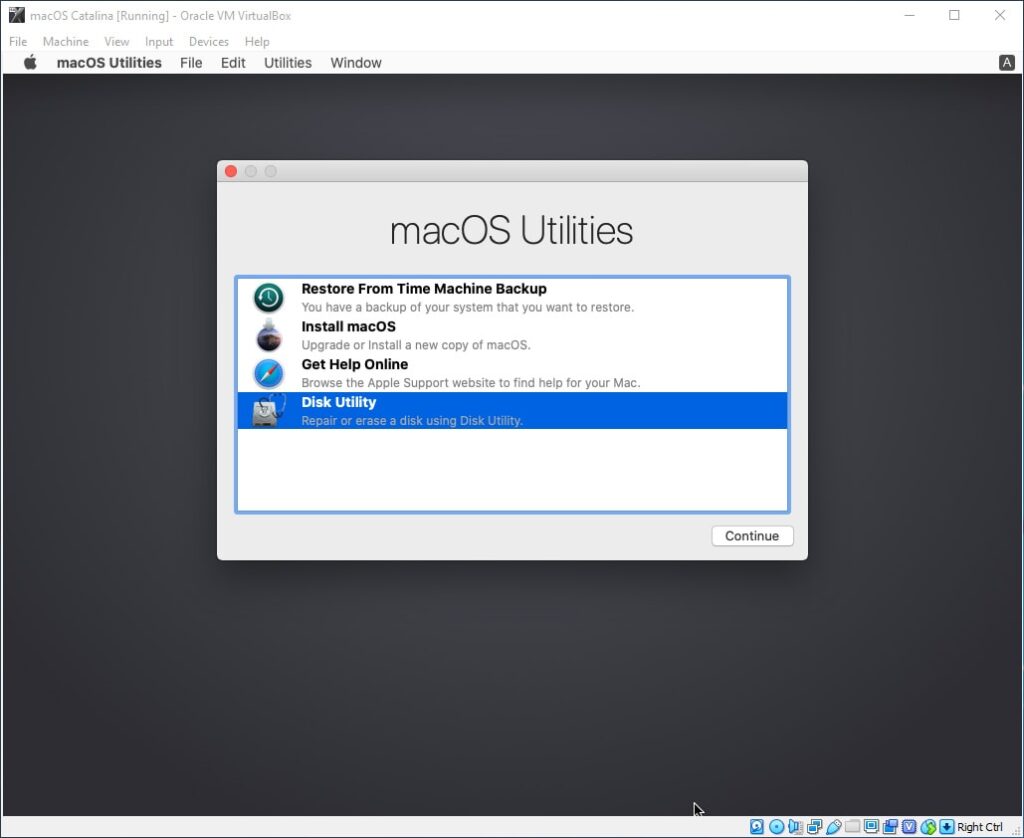
The preferred format is “Mac OS Extended (Journaled)”.
Complete the installation process, shutdown the VM and remove the ISO image from the storage settings, and restart the VM, answer the initialization questions are you’re in!